RenderDemo(7):用 OpenGL 实现滤镜
介绍用 OpenGL 实现滤镜的流程和原理,并提供 Demo 源码和解析。
想要学习和提升音视频技术的朋友,快来加入我们的【音视频技术社群】,加入后你就能:
- 1)下载 30+ 个开箱即用的「音视频及渲染 Demo 源代码」
- 2)下载包含 500+ 知识条目的完整版「音视频知识图谱」
- 3)下载包含 200+ 题目的完整版「音视频面试题集锦」
- 4)技术和职业发展咨询 100% 得到回答
- 5)获得简历优化建议和大厂内推
现在加入,送你一张 20 元优惠券:点击领取优惠券
微信扫码也可领取优惠券
这里是 RenderDemo 的第七篇:用 OpenGL 实现滤镜。我们分别在 iOS 和 Android 平台实现了用 OpenGL 对图像进行滤镜处理并渲染出来。
 滤镜处理图片效果
到目前我们已经在我们的付费知识星球中提供了下面这些音视频 Demo 和渲染 Demo 的工程源码,均可直接下载运行:
- iOS AVDemo(1):音频采集
- iOS AVDemo(2):音频编码
- iOS AVDemo(3):音频封装
- iOS AVDemo(4):音频解封装
- iOS AVDemo(5):音频解码
- iOS AVDemo(6):音频渲染
- iOS AVDemo(7):视频采集
- iOS AVDemo(8):视频编码
- iOS AVDemo(9):视频封装
- iOS AVDemo(10):视频解封装
- iOS AVDemo(11):视频转封装
- iOS AVDemo(12):视频编码
- iOS AVDemo(13):视频渲染
- Android AVDemo(1):音频采集
- Android AVDemo(2):音频编码
- Android AVDemo(3):音频封装
- Android AVDemo(4):音频解封装
- Android AVDemo(5):音频解码
- Android AVDemo(6):音频渲染
- Android AVDemo(7):视频采集
- Android AVDemo(8):视频编码
- Android AVDemo(9):视频封装
- Android AVDemo(10):视频解封装
- Android AVDemo(11):视频转封装
- Android AVDemo(12):视频解码
- Android AVDemo(13):视频渲染
- RenderDemo(1):用 OpenGL 画一个三角形(iOS+Android)
- RenderDemo(2):用 OpenGL 渲染视频(iOS+Android)
- RenderDemo(3):用 OpenGL 实现高斯模糊(iOS+Android)
- RenderDemo(4):用 OpenGL 实现反色(iOS+Android)
- RenderDemo(5):用 OpenGL 实现三分屏(iOS+Android)
- RenderDemo(6):用 OpenGL 实现贴纸(iOS+Android)
这些源码对于学习和理解 iOS/Android 音视频开发非常容易上手,有需要的朋友可以扫描下面二维码加入星球获取全部源码:

Look Up Table(简称 LUT,颜色查找表)是一种降低 GPU 运算量的技术,通过事先将颜色值存储在一张缓存表中当需要运算的时候直接从这张表中索引出对应的颜色值,本质上可看做计算机领域常见的存储空间换运算时间的算法应用,这项技术常用于图像调色领域。
1、滤镜基础知识
我们知道在 RGB888 色彩每个分量的有效值是 [0,256],那么完整采样的色域空间为就 256*256*256 约为 16M,意味着理论上约有 16M 种颜色可供调整。显然实际上并不会用到那么多的颜色,通常会通过列举节点来储存,而两个节点之间的颜色通过插值运算出来。
例如下图这张 512x512 分辨率大小的原始色彩LUT图(RGB 均为线性插值分布,效果即原始色彩)上面有 8x8 个大格子,也就是说每个网格的边长为 512/8=64,意味着每个大格子内部又可以分为 64x64 个小格子用来存储色彩像素点,则这张图总共能存 64 * 64 * 64 = 512 * 512 种色彩。
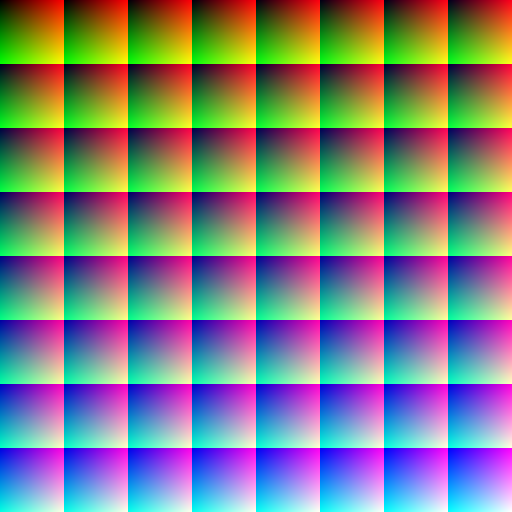 颜色查找表
颜色查找表
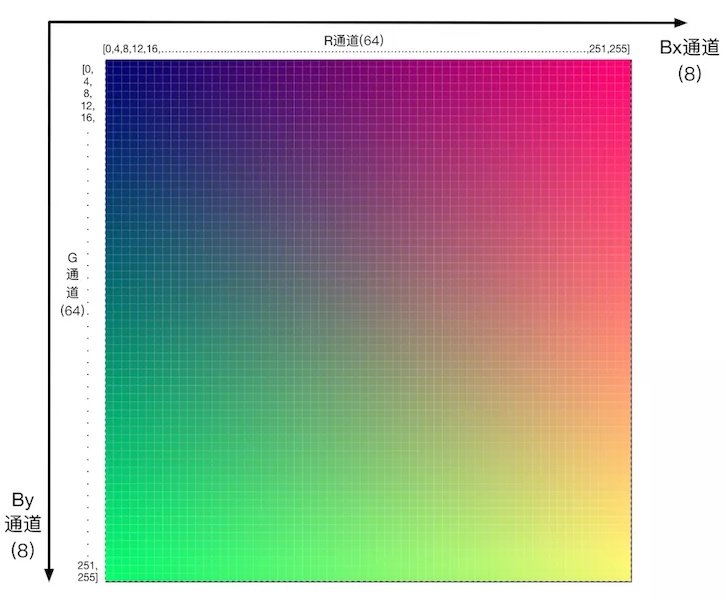
每个大格子中存有 64*64 个小格子,小格子的 x 轴表示 [0,255] 的 R 通道值,y 轴表示 [0,255] 的 G 通道,而巧妙的将 B 通道分量放到 8*8 的大格子中(从左到右,从上到下存着 64 种的某个数),最后 RGB 三个分量叠加后得到的色彩效果才是上面那张图。
 颜色查找表
颜色查找表
那么具体要如何利用 LUT 图片上存储的色彩呢,映射 LUT 颜色值的过程如下:
- 获取输入纹理的色彩值 px
- 根据 px 的 B 获取 LUT 图片上对应的 B,从而定位出第一层坐标的位置。
- 根据 px 上的 RG 获取 LUT 图片上对应的 RG,从而定位出第二层坐标的位置。
- 合并两层坐标利用(x,y)得到 px 映射在 LUT 图片上的颜色值。
1.1、Shader 实现
1
2
3
4
5
6
7
8
9
10
11
12
13
14
15
16
17
18
19
20
21
22
23
24
25
26
27
28
29
30
31
32
33
34
35
36
precision highp float;
varying vec2 textureCoordinate;
uniform sampler2D inputImageTexture;
uniform sampler2D lutTexture;

vec4 clut(vec4 textureColor, sampler2D textureLut, float intensity) {
   float blueColor = textureColor.b * 63.0;

    vec2 quad1;
    quad1.y = floor(floor(blueColor) / 8.0);
    quad1.x = floor(blueColor) - (quad1.y * 8.0);

    vec2 quad2;
    quad2.y = floor(ceil(blueColor) / 8.0);
    quad2.x = ceil(blueColor) - (quad2.y * 8.0);

    vec2 texPos1;
    texPos1.x = (quad1.x * 0.125) + 0.5/512.0 + ((0.125 - 1.0/512.0) * textureColor.r);
    texPos1.y = (quad1.y * 0.125) + 0.5/512.0 + ((0.125 - 1.0/512.0) * textureColor.g);

    vec2 texPos2;
    texPos2.x = (quad2.x * 0.125) + 0.5/512.0 + ((0.125 - 1.0/512.0) * textureColor.r);
    texPos2.y = (quad2.y * 0.125) + 0.5/512.0 + ((0.125 - 1.0/512.0) * textureColor.g);

    vec4 newColor1 = texture2D(textureLut, texPos1);
    vec4 newColor2 = texture2D(textureLut, texPos2);

    vec4 newColor = mix(newColor1, newColor2, fract(blueColor));
    return mix(textureColor, vec4(newColor.rgb, textureColor.w), intensity);
}

void main()
{
   vec4 color = texture2D(inputImageTexture, textureCoordinate);
   gl_FragColor = clut(color,lutTexture,1.0);
}
1.2、效果对比
 滤镜效果对比
2、iOS Demo
2.1、渲染模块
渲染模块与 OpenGL 高斯模糊 中讲到的一致,最终是封装出一个渲染视图 KFOpenGLView 用于展示最后的渲染结果。这里就不再细讲,只贴一下主要的类和类具体的功能:
KFOpenGLView:使用 OpenGL 实现的渲染 View,提供了设置画面填充模式的接口和渲染一帧纹理的接口。KFGLFilter:实现 shader 的加载、编译和着色器程序链接,以及 FBO 的管理。同时作为渲染处理节点,提供给了接口支持多级渲染。KFGLProgram:封装了使用 GL 程序的部分 API。KFGLFrameBuffer:封装了使用 FBO 的 API。KFTextureFrame:表示一帧纹理对象。KFFrame:表示一帧,类型可以是数据缓冲或纹理。KFGLTextureAttributes:对纹理 Texture 属性的封装。KFGLBase:定义了默认的 VertexShader 和 FragmentShader。KFUIImageConvertTexture:用于实现图片转纹理。
2.2、滤镜渲染结果渲染流程
我们在一个 ViewController 中分别实现了图片与视频采集 2 种实现方式。代码如下:
1) 图片渲染模式 KFImageRenderViewController
1
2
3
4
5
6
7
8
9
10
11
12
13
14
15
16
17
18
19
20
21
22
23
24
25
26
27
28
29
30
31
32
33
34
35
36
37
38
39
40
41
42
43
44
45
46
47
48
49
50
51
52
53
54
55
56
57
58
59
60
61
62
63
64
65
66
67
68
69
70
71
72
73
74
75
76
77
78
79
80
81
82
83
84
85
86
87
88
89
90
91
92
93
94
95
96
97
98
99
100
101
@interface KFImageRenderViewController (){
    GLuint _texture;
}
@property (nonatomic, strong) KFOpenGLView *glView;
@property (nonatomic, strong) KFPixelBufferConvertTexture *pixelBufferConvertTexture;
@property (nonatomic, strong) EAGLContext *context;
@property (nonatomic, strong) KFGLFilter *filter;
@end

@implementation KFImageRenderViewController
#pragma mark - Property

- (EAGLContext *)context {
    if (!_context) {
        _context = [[EAGLContext alloc] initWithAPI:kEAGLRenderingAPIOpenGLES2];
    }

    return _context;
}

- (void)dealloc {
    EAGLContext *preContext = [EAGLContext currentContext];
    [EAGLContext setCurrentContext:self.context];
    if(_texture){
        glDeleteTextures(1, &_texture);
    }
    [EAGLContext setCurrentContext:preContext];
}

- (KFPixelBufferConvertTexture *)pixelBufferConvertTexture {
    if (!_pixelBufferConvertTexture) {
        _pixelBufferConvertTexture = [[KFPixelBufferConvertTexture alloc] initWithContext:self.context];
    }

    return _pixelBufferConvertTexture;
}

- (KFGLFilter*)filter {
    if(!_filter){
        NSString *path = [[NSBundle mainBundle] pathForResource:@"filter" ofType:@"fs"];
        _filter = [[KFGLFilter alloc] initWithCustomFBO:NO vertexShader:KFDefaultVertexShader fragmentShader:[NSString stringWithContentsOfURL:[NSURL fileURLWithPath:path] encoding:NSUTF8StringEncoding error:nil]];
        __weak typeof(self) _self = self;
        _filter.preDrawCallBack = ^(){
            __strong typeof(_self) sself = _self;
            if(sself){
                glActiveTexture(GL_TEXTURE5);
                glBindTexture(GL_TEXTURE_2D, sself->_texture);
                glUniform1i([sself->_filter.getProgram getUniformLocation:@"lutTexture"], 5);
            }
        };
    }
    return _filter;
}

#pragma mark - Lifecycle
- (void)viewDidLoad {
    [super viewDidLoad];

    _texture = -1;
    [self setupUI];
    [self applyEffect];
}

- (void)viewDidAppear:(BOOL)animated {
    [super viewDidAppear:animated];
}

- (void)viewWillLayoutSubviews {
    [super viewWillLayoutSubviews];
    self.glView.frame = self.view.bounds;
}

- (void)setupUI {
    self.edgesForExtendedLayout = UIRectEdgeAll;
    self.extendedLayoutIncludesOpaqueBars = YES;
    self.title = @"image Render";
    self.view.backgroundColor = [UIColor whiteColor];


    // 渲染 view。
    _glView = [[KFOpenGLView alloc] initWithFrame:self.view.bounds context:self.context];
    _glView.fillMode = KFGLViewContentModeFit;
    [self.view addSubview:self.glView];
}

- (void)applyEffect {
    [EAGLContext setCurrentContext:self.context];
    UIImage *baseImage = [UIImage imageNamed:@"KeyframeLogo"];
    KFTextureFrame *textureFrame = [KFUIImageConvertTexture renderImage:baseImage];
    if(self->_texture == -1){
        self->_texture = [KFGLBase newTextureForImage:[UIImage imageNamed:@"lut"]];
    }


    KFTextureFrame *filterFrame = [self.filter render:textureFrame];

    [self.glView displayFrame:filterFrame];
    [EAGLContext setCurrentContext:nil];
}

@end
2) 视频采集渲染模式 KFVideoRenderViewController
1
2
3
4
5
6
7
8
9
10
11
12
13
14
15
16
17
18
19
20
21
22
23
24
25
26
27
28
29
30
31
32
33
34
35
36
37
38
39
40
41
42
43
44
45
46
47
48
49
50
51
52
53
54
55
56
57
58
59
60
61
62
63
64
65
66
67
68
69
70
71
72
73
74
75
76
77
78
79
80
81
82
83
84
85
86
87
88
89
90
91
92
93
94
95
96
97
98
99
100
101
102
103
104
105
106
107
108
109
110
111
112
113
114
115
116
117
118
119
120
121
122
123
124
125
126
127
128
129
130
131
132
133
134
135
136
137
138
139
140
141
142
143
144
145
146
147
148
149
@interface KFVideoRenderViewController (){
    GLuint _texture;
}
@property (nonatomic, strong) KFVideoCaptureConfig *videoCaptureConfig;
@property (nonatomic, strong) KFVideoCapture *videoCapture;
@property (nonatomic, strong) KFOpenGLView *glView;
@property (nonatomic, strong) KFPixelBufferConvertTexture *pixelBufferConvertTexture;
@property (nonatomic, strong) EAGLContext *context;
@property (nonatomic, strong) KFGLFilter *filter;
@end

@implementation KFVideoRenderViewController
#pragma mark - Property
- (KFVideoCaptureConfig *)videoCaptureConfig {
    if (!_videoCaptureConfig) {
        _videoCaptureConfig = [[KFVideoCaptureConfig alloc] init];
    }

    return _videoCaptureConfig;
}

- (EAGLContext *)context {
    if (!_context) {
        _context = [[EAGLContext alloc] initWithAPI:kEAGLRenderingAPIOpenGLES2];
    }

    return _context;
}

- (KFPixelBufferConvertTexture *)pixelBufferConvertTexture {
    if (!_pixelBufferConvertTexture) {
        _pixelBufferConvertTexture = [[KFPixelBufferConvertTexture alloc] initWithContext:self.context];
    }

    return _pixelBufferConvertTexture;
}

- (KFVideoCapture *)videoCapture {
    if (!_videoCapture) {
        _videoCapture = [[KFVideoCapture alloc] initWithConfig:self.videoCaptureConfig];
        __weak typeof(self) weakSelf = self;
        _videoCapture.sampleBufferOutputCallBack = ^(CMSampleBufferRef sampleBuffer) {
             // 视频采集数据回调。将采集回来的数据给渲染模块渲染。
            [EAGLContext setCurrentContext:weakSelf.context];
            KFTextureFrame *textureFrame = [weakSelf.pixelBufferConvertTexture renderFrame:CMSampleBufferGetImageBuffer(sampleBuffer) time:CMSampleBufferGetPresentationTimeStamp(sampleBuffer)];
            KFTextureFrame *filterFrame = [weakSelf.filter render:textureFrame];
            [weakSelf.glView displayFrame:filterFrame];
            [EAGLContext setCurrentContext:nil];
        };
        _videoCapture.sessionErrorCallBack = ^(NSError* error) {
            NSLog(@"KFVideoCapture Error:%zi %@", error.code, error.localizedDescription);
        };
    }

    return _videoCapture;
}

- (KFGLFilter*)filter {
    if(!_filter){
        NSString *path = [[NSBundle mainBundle] pathForResource:@"filter" ofType:@"fs"];
        _filter = [[KFGLFilter alloc] initWithCustomFBO:NO vertexShader:KFDefaultVertexShader fragmentShader:[NSString stringWithContentsOfURL:[NSURL fileURLWithPath:path] encoding:NSUTF8StringEncoding error:nil]];
        __weak typeof(self) _self = self;
        _filter.preDrawCallBack = ^(){
            __strong typeof(_self) sself = _self;
            if(sself){
                if(sself->_texture == -1){
                    sself->_texture = [KFGLBase newTextureForImage:[UIImage imageNamed:@"lut"]];
                }

                glActiveTexture(GL_TEXTURE5);
                glBindTexture(GL_TEXTURE_2D, sself->_texture);
                glUniform1i([sself->_filter.getProgram getUniformLocation:@"lutTexture"], 5);
            }
        };
    }
    return _filter;
}

#pragma mark - Lifecycle
- (void)viewDidLoad {
    [super viewDidLoad];

    _texture = -1;
    [self requestAccessForVideo];
    [self setupUI];
}

- (void)viewWillLayoutSubviews {
    [super viewWillLayoutSubviews];
    self.glView.frame = self.view.bounds;
}

- (void)dealloc {
    EAGLContext *preContext = [EAGLContext currentContext];
    [EAGLContext setCurrentContext:self.context];
    if(_texture){
        glDeleteTextures(1, &_texture);
    }
    [EAGLContext setCurrentContext:preContext];
}

#pragma mark - Action
- (void)changeCamera {
    [self.videoCapture changeDevicePosition:self.videoCapture.config.position == AVCaptureDevicePositionBack ? AVCaptureDevicePositionFront : AVCaptureDevicePositionBack];
}

#pragma mark - Private Method
- (void)requestAccessForVideo {
    __weak typeof(self) weakSelf = self;
    AVAuthorizationStatus status = [AVCaptureDevice authorizationStatusForMediaType:AVMediaTypeVideo];
    switch (status) {
        case AVAuthorizationStatusNotDetermined:{
            // 许可对话没有出现,发起授权许可。
            [AVCaptureDevice requestAccessForMediaType:AVMediaTypeVideo completionHandler:^(BOOL granted) {
                if (granted) {
                    [weakSelf.videoCapture startRunning];
                } else {
                    // 用户拒绝。
                }
            }];
            break;
        }
        case AVAuthorizationStatusAuthorized:{
            // 已经开启授权,可继续。
            [weakSelf.videoCapture startRunning];
            break;
        }
        default:
            break;
    }
}

- (void)setupUI {
    self.edgesForExtendedLayout = UIRectEdgeAll;
    self.extendedLayoutIncludesOpaqueBars = YES;
    self.title = @"Video Render";
    self.view.backgroundColor = [UIColor whiteColor];

    // Navigation item.
    UIBarButtonItem *cameraBarButton = [[UIBarButtonItem alloc] initWithTitle:@"Camera" style:UIBarButtonItemStylePlain target:self action:@selector(changeCamera)];
    self.navigationItem.rightBarButtonItems = @[cameraBarButton];

    // 渲染 view。
    _glView = [[KFOpenGLView alloc] initWithFrame:self.view.bounds context:self.context];
    _glView.fillMode = KFGLViewContentModeFill;
    [self.view addSubview:self.glView];
}

@end
通过上面的代码,可以看到我们是用 KFGLFilter 来封装一次 OpenGL 的处理节点,它可以接收一个 KFTextureFrame 对象,加载 Shader 对其进行渲染处理,处理完后输出处理后的 KFTextureFrame,然后可以接着交给下一个 KFGLFilter 来处理,就像一条渲染链。
3、Android Demo
3.1、渲染模块
渲染模块与 OpenGL 高斯模糊 中讲到的一致,最终是封装出一个渲染视图 KFRenderView 用于展示最后的渲染结果。这里就不再细讲,只贴一下主要的类和类具体的功能:
KFGLContext:负责创建 OpenGL 环境,负责管理和组装 EGLDisplay、EGLSurface、EGLContext。KFGLFilter:实现 shader 的加载、编译和着色器程序链接,以及 FBO 的管理。同时作为渲染处理节点,提供给了接口支持多级渲染。KFGLProgram:负责加载和编译着色器,创建着色器程序容器。KFGLBase:定义了默认的 VertexShader 和 FragmentShader。KFSurfaceView:KFSurfaceView 继承自 SurfaceView 来实现渲染。KFTextureView:KFTextureView 继承自 TextureView 来实现渲染。KFFrame:表示一帧,类型可以是数据缓冲或纹理。KFRenderView:KFRenderView 是一个容器,可以选择使用 KFSurfaceView 或 KFTextureView 作为实际的渲染视图。
3.2、滤镜渲染结果渲染流程
我们在一个 MainActivity 中分别实现了图片与视频采集 2 种实现方式。代码如下:
1) 图片渲染模式 KFImageRenderActivity
1
2
3
4
5
6
7
8
9
10
11
12
13
14
15
16
17
18
19
20
21
22
23
24
25
26
27
28
29
30
31
32
33
34
35
36
37
38
39
40
41
42
43
44
45
46
47
48
49
50
51
52
53
54
55
56
57
58
59
60
61
62
63
64
65
66
67
68
69
70
71
72
73
74
75
76
77
78
79
80
81
82
83
84
85
86
87
88
89
90
91
92
93
94
95
96
97
98
99
100
101
102
103
104
105
106
107
108
109
110
111
112
113
114
115
116
117
118
119
120
121
122
123
124
125
126
127
128
129
130
131
132
133
134
135
136
137
138
public class KFImageRenderActivity extends AppCompatActivity {
    private KFRenderView mRenderView;
    private KFGLContext mGLContext;
    private KFGLFilter mGLFilter;
    private Bitmap mLutBitmap;
    private int mLutTexture;
    private Bitmap mLogoBitmap;
    private int mLogoTexture;
    private String mFragmentShaderString;

    @Override
    protected void onCreate(Bundle savedInstanceState) {
        super.onCreate(savedInstanceState);
        setContentView(R.layout.activity_kfimage_render3);
        mLutBitmap = getImageFromAssetsFile(this,"lut.png");
        mFragmentShaderString = getShaderString(this,"filter.fs");

        mLogoBitmap = getImageFromAssetsFile(this,"KeyframeLogo.jpg");
        mLogoBitmap = getTurnOverBitmap(mLogoBitmap);

        mGLContext = new KFGLContext(null);
        mRenderView = new KFRenderView(this, mGLContext.getContext(), new KFRenderListener() {
            @Override
            public void surfaceCreate(@NonNull Surface surface) {

            }

            @Override
            public void surfaceChanged(@NonNull Surface surface, int width, int height) {
                applyEffect();
            }

            @Override
            public void surfaceDestroy(@NonNull Surface surface) {

            }
        });
        mRenderView.setFillMode(KFRenderView.KFRenderMode.KFRenderModeFit);
        WindowManager windowManager = (WindowManager)this.getSystemService(this.WINDOW_SERVICE);
        Rect outRect = new Rect();
        windowManager.getDefaultDisplay().getRectSize(outRect);
        FrameLayout.LayoutParams params = new FrameLayout.LayoutParams(outRect.width(), outRect.height());
        addContentView(mRenderView,params);
    }

    private KFGLFilterListener mFilterListener = new KFGLFilterListener() {
        @RequiresApi(api = Build.VERSION_CODES.LOLLIPOP)
        @Override
        public void preOnDraw() {
            glActiveTexture(GLES20.GL_TEXTURE5);
            glBindTexture(GLES20.GL_TEXTURE_2D, mLutTexture);
            glUniform1i(mGLFilter.getOutputProgram().getUniformLocation("lutTexture"), 5);
        }

        @Override
        public void postOnDraw() {

        }
    };

    public void applyEffect() {
        mGLContext.bind();
        if(mGLFilter == null){
            mGLFilter = new KFGLFilter(false, KFGLBase.defaultVertexShader,mFragmentShaderString,mFilterListener,null);

            int[] textures = new int[1];
            glGenTextures(1, textures, 0);
            mLutTexture = textures[0];
            glActiveTexture(GLES20.GL_TEXTURE0);
            glBindTexture(GLES20.GL_TEXTURE_2D, mLutTexture);
            glTexParameteri(GLES20.GL_TEXTURE_2D, GLES20.GL_TEXTURE_MIN_FILTER, GLES20.GL_LINEAR);
            glTexParameteri(GLES20.GL_TEXTURE_2D, GLES20.GL_TEXTURE_MAG_FILTER, GLES20.GL_LINEAR);
            glTexParameteri(GLES20.GL_TEXTURE_2D, GLES20.GL_TEXTURE_WRAP_S, GLES20.GL_CLAMP_TO_EDGE);
            glTexParameteri(GLES20.GL_TEXTURE_2D, GLES20.GL_TEXTURE_WRAP_T, GLES20.GL_CLAMP_TO_EDGE);
            GLUtils.texImage2D(GLES20.GL_TEXTURE_2D, 0, mLutBitmap, 0);
            mLutBitmap.recycle();

            int[] textures1 = new int[1];
            glGenTextures(1, textures1, 0);
            mLogoTexture = textures1[0];
            glActiveTexture(GLES20.GL_TEXTURE0);
            glBindTexture(GLES20.GL_TEXTURE_2D, mLogoTexture);
            glTexParameteri(GLES20.GL_TEXTURE_2D, GLES20.GL_TEXTURE_MIN_FILTER, GLES20.GL_LINEAR);
            glTexParameteri(GLES20.GL_TEXTURE_2D, GLES20.GL_TEXTURE_MAG_FILTER, GLES20.GL_LINEAR);
            glTexParameteri(GLES20.GL_TEXTURE_2D, GLES20.GL_TEXTURE_WRAP_S, GLES20.GL_CLAMP_TO_EDGE);
            glTexParameteri(GLES20.GL_TEXTURE_2D, GLES20.GL_TEXTURE_WRAP_T, GLES20.GL_CLAMP_TO_EDGE);
            GLUtils.texImage2D(GLES20.GL_TEXTURE_2D, 0, mLogoBitmap, 0);
            mLogoBitmap.recycle();
        }
        KFTextureFrame frame = new KFTextureFrame(mLogoTexture,new Size(mLogoBitmap.getWidth(),mLogoBitmap.getHeight()),0);
        KFFrame filterFrame = mGLFilter.render((KFTextureFrame)frame);
        mRenderView.render((KFTextureFrame) filterFrame);
        mGLContext.unbind();
    }

    public Bitmap getTurnOverBitmap(Bitmap bitmap) {
        Canvas canvas = new Canvas();
        Bitmap output = Bitmap.createBitmap(bitmap.getWidth(),
                bitmap.getHeight(), Bitmap.Config.ARGB_8888);
        canvas.setBitmap(output);
        Matrix matrix = new Matrix();
        // 缩放 当sy为-1时向上翻转 当sx为-1时向左翻转 sx、sy都为-1时相当于旋转180°
        matrix.postScale(1, -1);
        // 因为向上翻转了所以y要向下平移一个bitmap的高度
        matrix.postTranslate(0, bitmap.getHeight());
        canvas.drawBitmap(bitmap, matrix, null);
        return output;
    }

    private Bitmap getImageFromAssetsFile(Context context, String fileName) {
        Bitmap image = null;
        AssetManager am = context.getResources().getAssets();
        try {
            InputStream is = am.open(fileName);
            image = BitmapFactory.decodeStream(is);
            is.close();
        } catch (IOException e) {
            e.printStackTrace();
        }
        return image;
    }

    private static String getShaderString(Context context,String fileName) {
        StringBuilder stringBuilder = new StringBuilder();
        try {
            AssetManager assetManager = context.getAssets();
            BufferedReader bf = new BufferedReader(new InputStreamReader(
                    assetManager.open(fileName)));
            String line;
            while ((line = bf.readLine()) != null) {
                stringBuilder.append(line);
            }
        } catch (IOException e) {
            e.printStackTrace();
        }
        return stringBuilder.toString();
    }
}
2) 视频采集渲染模式 KFVideoRenderActivity
1
2
3
4
5
6
7
8
9
10
11
12
13
14
15
16
17
18
19
20
21
22
23
24
25
26
27
28
29
30
31
32
33
34
35
36
37
38
39
40
41
42
43
44
45
46
47
48
49
50
51
52
53
54
55
56
57
58
59
60
61
62
63
64
65
66
67
68
69
70
71
72
73
74
75
76
77
78
79
80
81
82
83
84
85
86
87
88
89
90
91
92
93
94
95
96
97
98
99
100
101
102
103
104
105
106
107
108
109
110
111
112
113
114
115
116
117
118
119
120
121
122
123
124
125
126
127
128
129
130
131
132
133
134
135
136
137
138
139
140
141
142
public class KFVideoRenderActivity extends AppCompatActivity {
    private KFIVideoCapture mCapture;
    private KFVideoCaptureConfig mCaptureConfig;
    private KFRenderView mRenderView;
    private KFGLContext mGLContext;
    private KFGLFilter mGLFilter;
    private Bitmap mLutBitmap;
    private int mLutTexture;
    private String mFragmentShaderString;
    @Override
    protected void onCreate(Bundle savedInstanceState) {
        super.onCreate(savedInstanceState);
        setContentView(R.layout.activity_kfvideo_render);

        mLutBitmap = getImageFromAssetsFile(this,"lut.png");
        mFragmentShaderString = getShaderString(this,"filter.fs");

        if (ActivityCompat.checkSelfPermission(this, Manifest.permission.RECORD_AUDIO) != PackageManager.PERMISSION_GRANTED || ActivityCompat.checkSelfPermission(this, Manifest.permission.CAMERA) != PackageManager.PERMISSION_GRANTED ||
                ActivityCompat.checkSelfPermission(this, Manifest.permission.READ_EXTERNAL_STORAGE) != PackageManager.PERMISSION_GRANTED ||
                ActivityCompat.checkSelfPermission(this, Manifest.permission.WRITE_EXTERNAL_STORAGE) != PackageManager.PERMISSION_GRANTED) {
            ActivityCompat.requestPermissions((Activity) this,
                    new String[] {Manifest.permission.CAMERA,Manifest.permission.RECORD_AUDIO, Manifest.permission.READ_EXTERNAL_STORAGE, Manifest.permission.WRITE_EXTERNAL_STORAGE},
                    1);
        }

        mGLContext = new KFGLContext(null);
        mRenderView = new KFRenderView(this,mGLContext.getContext());
        WindowManager windowManager = (WindowManager)this.getSystemService(this.WINDOW_SERVICE);
        Rect outRect = new Rect();
        windowManager.getDefaultDisplay().getRectSize(outRect);
        FrameLayout.LayoutParams params = new FrameLayout.LayoutParams(outRect.width(), outRect.height());
        addContentView(mRenderView,params);

        mCaptureConfig = new KFVideoCaptureConfig();
        mCaptureConfig.cameraFacing = LENS_FACING_FRONT;
        mCaptureConfig.resolution = new Size(720,1280);
        mCaptureConfig.fps = 30;
        boolean useCamera2 = false;
        if(useCamera2){
            mCapture = new KFVideoCaptureV2();
        }else{
            mCapture = new KFVideoCaptureV1();
        }
        mCapture.setup(this,mCaptureConfig,mVideoCaptureListener,mGLContext.getContext());
        mCapture.startRunning();
    }

    private KFVideoCaptureListener mVideoCaptureListener = new KFVideoCaptureListener() {
        @Override
        public void cameraOnOpened(){}

        @Override
        public void cameraOnClosed() {
        }

        @Override
        public void cameraOnError(int error,String errorMsg) {

        }

        @RequiresApi(api = Build.VERSION_CODES.LOLLIPOP)
        @Override
        public void onFrameAvailable(KFFrame frame) {
            mGLContext.bind();
            if(mGLFilter == null){
                mGLFilter = new KFGLFilter(false, KFGLBase.defaultVertexShader,mFragmentShaderString,mFilterListener,null);
                int[] textures = new int[1];
                glGenTextures(1, textures, 0);
                mLutTexture = textures[0];
                glActiveTexture(GLES20.GL_TEXTURE0);
                glBindTexture(GLES20.GL_TEXTURE_2D, mLutTexture);
                glTexParameteri(GLES20.GL_TEXTURE_2D, GLES20.GL_TEXTURE_MIN_FILTER, GLES20.GL_LINEAR);
                glTexParameteri(GLES20.GL_TEXTURE_2D, GLES20.GL_TEXTURE_MAG_FILTER, GLES20.GL_LINEAR);
                glTexParameteri(GLES20.GL_TEXTURE_2D, GLES20.GL_TEXTURE_WRAP_S, GLES20.GL_CLAMP_TO_EDGE);
                glTexParameteri(GLES20.GL_TEXTURE_2D, GLES20.GL_TEXTURE_WRAP_T, GLES20.GL_CLAMP_TO_EDGE);
                GLUtils.texImage2D(GLES20.GL_TEXTURE_2D, 0, mLutBitmap, 0);
                mLutBitmap.recycle();
            }
            KFFrame filterFrame = mGLFilter.render((KFTextureFrame)frame);
            mRenderView.render((KFTextureFrame) filterFrame);
            mGLContext.unbind();
        }

        private KFGLFilterListener mFilterListener = new KFGLFilterListener() {
            @RequiresApi(api = Build.VERSION_CODES.LOLLIPOP)
            @Override
            public void preOnDraw() {
                glActiveTexture(GLES20.GL_TEXTURE5);
                glBindTexture(GLES20.GL_TEXTURE_2D, mLutTexture);
                glUniform1i(mGLFilter.getOutputProgram().getUniformLocation("lutTexture"), 5);
            }

            @Override
            public void postOnDraw() {

            }
        };
    };

    public Bitmap getTurnOverBitmap(Bitmap bitmap) {
        Canvas canvas = new Canvas();
        Bitmap output = Bitmap.createBitmap(bitmap.getWidth(),
                bitmap.getHeight(), Bitmap.Config.ARGB_8888);
        canvas.setBitmap(output);
        Matrix matrix = new Matrix();
        // 缩放 当sy为-1时向上翻转 当sx为-1时向左翻转 sx、sy都为-1时相当于旋转180°
        matrix.postScale(1, -1);
        // 因为向上翻转了所以y要向下平移一个bitmap的高度
        matrix.postTranslate(0, bitmap.getHeight());
        canvas.drawBitmap(bitmap, matrix, null);
        return output;
    }

    private Bitmap getImageFromAssetsFile(Context context, String fileName) {
        Bitmap image = null;
        AssetManager am = context.getResources().getAssets();
        try {
            InputStream is = am.open(fileName);
            image = BitmapFactory.decodeStream(is);
            is.close();
        } catch (IOException e) {
            e.printStackTrace();
        }
        return image;
    }

    private static String getShaderString(Context context,String fileName) {
        StringBuilder stringBuilder = new StringBuilder();
        try {
            AssetManager assetManager = context.getAssets();
            BufferedReader bf = new BufferedReader(new InputStreamReader(
                    assetManager.open(fileName)));
            String line;
            while ((line = bf.readLine()) != null) {
                stringBuilder.append(line);
            }
        } catch (IOException e) {
            e.printStackTrace();
        }
        return stringBuilder.toString();
    }
}
可见,当我们用 KFGLFilter 将 OpenGL 渲染能力封装起来,并可以像增加渲染处理节点一样往现有渲染链中增加新的图像处理功能时,相关改动就变得很方便了。
本文转自微信公众号
关键帧Keyframe,推荐您关注来获取音视频、AI 领域的最新技术和产品信息:
微信扫码关注我们
你还可以加入我们的微信群和更多同行朋友来交流和讨论:
微信扫码进群