探索 Metal 音视频技术(4):渲染上下文
本文将介绍 Metal 渲染上下文。
探索 Metal 音视频技术(4):渲染上下文
想要学习和提升音视频技术的朋友,快来加入我们的【音视频技术社群】,加入后你就能:
- 1)下载 30+ 个开箱即用的「音视频及渲染 Demo 源代码」
- 2)下载包含 500+ 知识条目的完整版「音视频知识图谱」
- 3)下载包含 200+ 题目的完整版「音视频面试题集锦」
- 4)技术和职业发展咨询 100% 得到回答
- 5)获得简历优化建议和大厂内推
现在加入,送你一张 20 元优惠券:点击领取优惠券
微信扫码也可领取优惠券
这个系列文章我们来探索 Metal 音视频技术,对于想要开始学习音视频技术的朋友,这些文章是份不错的入门资料,本篇介绍渲染上下文。
本章介绍如何创建并使用 MTLRenderCommandEncoder和 MTLParallelRenderCommandEncoder 对象,这两个对象用于将图形渲染命令编码到命令缓冲区中。MTLRenderCommandEncoder 命令描述了一个图形渲染管线,如图所示。
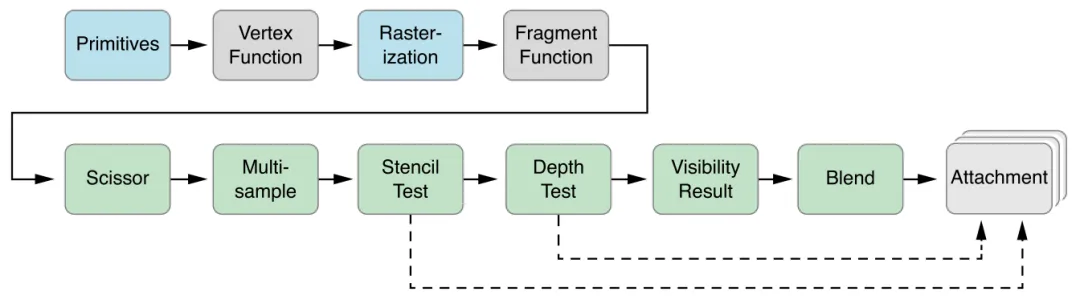 Metal 图形渲染管线
MTLRenderCommandEncoder对象代表单个渲染命令编码器。MTLParallelRenderCommandEncoder对象允许将单个渲染通道拆分为多个独立的MTLRenderCommandEncoder对象,每个编码器可以分配到一个不同的线程。不同渲染命令编码器生成的命令会被按顺序链接并执行,详见“使用多线程执行渲染通道”。
1、创建并使用渲染命令编码器
要创建、初始化并使用单个渲染命令编码器,请按以下步骤操作:
- 创建
MTLRenderPassDescriptor对象,定义一组附件,作为该渲染通道中图形命令的渲染目标。通常只创建一次并每帧重用。 - 调用
MTLCommandBuffer的renderCommandEncoderWithDescriptor:方法,传入渲染通道描述符,创建MTLRenderCommandEncoder对象。 - 创建
MTLRenderPipelineState对象,定义图形渲染管线的状态(包括着色器、混合、多重采样和可见性测试)。通过setRenderPipelineState:方法将其设置为当前渲染管线状态。 - 设置纹理、缓冲区和采样器,详见“为渲染命令编码器指定资源”。
- 调用
MTLRenderCommandEncoder方法设置固定功能状态,如深度和模板状态。 - 调用
MTLRenderCommandEncoder方法绘制图形图元,详见“绘制几何图元”。
1.1、创建渲染通道描述符
MTLRenderPassDescriptor对象表示渲染命令的目标,即一组附件。其属性包括:
- 最多 4 个颜色附件
- 1 个深度附件
- 1 个模板附件
每个附件由附件描述符表示,需指定纹理及其像素格式:
- 颜色附件:
MTLPixelFormatRGBA8Unorm等颜色可渲染格式 - 深度附件:
MTLPixelFormatDepth32Float等深度可渲染格式 - 模板附件:
MTLPixelFormatStencil8等模板可渲染格式
1.1.1、加载与存储操作
- loadAction:渲染通道开始时对附件执行的操作
MTLLoadActionClear:清除为指定值MTLLoadActionLoad:保留原有内容MTLLoadActionDontCare:不关心初始值(性能最佳)
- storeAction:渲染通道结束时对附件执行的操作
MTLStoreActionStore:保存渲染结果MTLStoreActionMultisampleResolve:将多重采样解析到resolveTextureMTLStoreActionDontCare:不保存结果(性能最佳)
1.1.2、创建带颜色与深度附件的渲染通道描述符
1
2
3
4
5
6
7
8
9
10
11
12
13
14
15
16
17
18
19
20
MTLTextureDescriptor *colorTexDesc = [MTLTextureDescriptor
    texture2DDescriptorWithPixelFormat:MTLPixelFormatRGBA8Unorm
    width:IMAGE_WIDTH height:IMAGE_HEIGHT mipmapped:NO];
id <MTLTexture> colorTex = [device newTextureWithDescriptor:colorTexDesc];

MTLTextureDescriptor *depthTexDesc = [MTLTextureDescriptor
    texture2DDescriptorWithPixelFormat:MTLPixelFormatDepth32Float
    width:IMAGE_WIDTH height:IMAGE_HEIGHT mipmapped:NO];
id <MTLTexture> depthTex = [device newTextureWithDescriptor:depthTexDesc];

MTLRenderPassDescriptor *renderPassDesc = [MTLRenderPassDescriptor renderPassDescriptor];
renderPassDesc.colorAttachments[0].texture = colorTex;
renderPassDesc.colorAttachments[0].loadAction = MTLLoadActionClear;
renderPassDesc.colorAttachments[0].storeAction = MTLStoreActionStore;
renderPassDesc.colorAttachments[0].clearColor = MTLClearColorMake(0.0, 1.0, 0.0, 1.0);

renderPassDesc.depthAttachment.texture = depthTex;
renderPassDesc.depthAttachment.loadAction = MTLLoadActionClear;
renderPassDesc.depthAttachment.storeAction = MTLStoreActionStore;
renderPassDesc.depthAttachment.clearDepth = 1.0;
1.2、使用 Core Animation 显示渲染内容
- 使用
CAMetalLayer作为 Metal 渲染内容的显示层。 - 每帧通过
nextDrawable获取CAMetalDrawable对象,使用其texture作为颜色附件。 - 设置
CAMetalLayer的属性,如device、pixelFormat、drawableSize等。 - 渲染完成后调用
presentDrawable:或present方法将内容提交到屏幕。
2、创建渲染管线状态
2.1、创建并配置渲染管线描述符
- 创建
MTLRenderPipelineDescriptor对象。 - 设置
vertexFunction和fragmentFunction。 - 设置颜色附件的像素格式。
- 可选设置:
depthAttachmentPixelFormat、stencilAttachmentPixelFormat、vertexDescriptor、sampleCount等。
2.2、从描述符创建渲染管线状态
- 同步创建:
newRenderPipelineStateWithDescriptor:error: - 异步创建:
newRenderPipelineStateWithDescriptor:completionHandler:
示例:
1
2
3
4
5
6
7
8
9
MTLRenderPipelineDescriptor *renderPipelineDesc = [[MTLRenderPipelineDescriptor alloc] init];
renderPipelineDesc.vertexFunction = vertFunc;
renderPipelineDesc.fragmentFunction = fragFunc;
renderPipelineDesc.colorAttachments[0].pixelFormat = MTLPixelFormatRGBA8Unorm;

NSError *errors = nil;
id <MTLRenderPipelineState> pipeline = [device
    newRenderPipelineStateWithDescriptor:renderPipelineDesc error:&errors];
[renderCE setRenderPipelineState:pipeline];
3、配置混合(Blending)
在颜色附件中启用混合:
1
2
3
4
5
renderPipelineDesc.colorAttachments[0].blendingEnabled = YES;
renderPipelineDesc.colorAttachments[0].rgbBlendOperation = MTLBlendOperationAdd;
renderPipelineDesc.colorAttachments[0].alphaBlendOperation = MTLBlendOperationAdd;
renderPipelineDesc.colorAttachments[0].sourceRGBBlendFactor = MTLBlendFactorOne;
renderPipelineDesc.colorAttachments[0].destinationRGBBlendFactor = MTLBlendFactorOneMinusSourceAlpha;
4、为渲染命令编码器指定资源
使用如下方法为顶点/片段函数设置资源:
setVertexBuffer:offset:atIndex:setVertexTexture:atIndex:setFragmentBuffer:offset:atIndex:setFragmentTexture:atIndex:
确保 Metal 着色器中的 [[buffer(index)]]、[[texture(index)]] 与设置时的索引一致。
5、顶点描述符(Vertex Descriptor)
用于描述顶点数据在缓冲区中的布局:
1
2
3
4
5
6
7
8
9
MTLVertexDescriptor* vertexDesc = [[MTLVertexDescriptor alloc] init];
vertexDesc.attributes[0].format = MTLVertexFormatFloat2;
vertexDesc.attributes[0].bufferIndex = 0;
vertexDesc.attributes[0].offset = 0;

vertexDesc.layouts[0].stride = sizeof(Vertex);
vertexDesc.layouts[0].stepFunction = MTLVertexStepFunctionPerVertex;

renderPipelineDesc.vertexDescriptor = vertexDesc;
6、固定功能状态设置
setViewport::设置视口setCullMode:和setFrontFacingWinding::设置剔除模式setDepthStencilState::设置深度/模板状态setBlendColorRed:green:blue:alpha::设置混合颜色setScissorRect::设置裁剪矩形
7、绘制几何图元
使用如下方法绘制:
1
2
3
4
5
6
7
8
[renderEncoder drawPrimitives:MTLPrimitiveTypeTriangle
               vertexStart:0 vertexCount:3];

[renderEncoder drawIndexedPrimitives:MTLPrimitiveTypeTriangle
                      indexCount:3
                       indexType:MTLIndexTypeUInt16
                     indexBuffer:indexBuffer
               indexBufferOffset:0];
8、使用多线程渲染
使用 MTLParallelRenderCommandEncoder 将渲染任务分配到多个线程:
1
2
3
4
5
6
7
8
9
id <MTLParallelRenderCommandEncoder> parallelRCE =
    [commandBuffer parallelRenderCommandEncoderWithDescriptor:renderPassDesc];

id <MTLRenderCommandEncoder> rCE1 = [parallelRCE renderCommandEncoder];
id <MTLRenderCommandEncoder> rCE2 = [parallelRCE renderCommandEncoder];

[rCE1 endEncoding];
[rCE2 endEncoding];
[parallelRCE endEncoding];
本文转自微信公众号
关键帧Keyframe,推荐您关注来获取音视频、AI 领域的最新技术和产品信息:
微信扫码关注我们
你还可以加入我们的微信群和更多同行朋友来交流和讨论:
微信扫码进群
本文由作者按照 CC BY-NC-ND 4.0 进行授权