iOS AVDemo(7):视频采集,代码开源并提供解析
介绍 iOS 视频采集流程和原理,并提供 Demo 源码和解析。
想要学习和提升音视频技术的朋友,快来加入我们的【音视频技术社群】,加入后你就能:
- 1)下载 30+ 个开箱即用的「音视频及渲染 Demo 源代码」
- 2)下载包含 500+ 知识条目的完整版「音视频知识图谱」
- 3)下载包含 200+ 题目的完整版「音视频面试题集锦」
- 4)技术和职业发展咨询 100% 得到回答
- 5)获得简历优化建议和大厂内推
现在加入,送你一张 20 元优惠券:点击领取优惠券
微信扫码也可领取优惠券
iOS/Android 客户端开发同学如果想要开始学习音视频开发,最丝滑的方式是对音视频基础概念知识有一定了解后,再借助 iOS/Android 平台的音视频能力上手去实践音视频的采集 → 编码 → 封装 → 解封装 → 解码 → 渲染过程,并借助音视频实用工具来分析和理解对应的音视频数据。
在音视频工程示例这个栏目,我们将通过拆解采集 → 编码 → 封装 → 解封装 → 解码 → 渲染流程并实现 Demo 来向大家介绍如何在 iOS/Android 平台上手音视频开发。
这里是第七篇:iOS 视频采集 Demo。这个 Demo 里包含以下内容:
- 1)实现一个视频采集模块;
- 2)实现视频采集逻辑并将采集的视频图像渲染进行预览,同时支持将数据转换为图片存储到相册;
- 3)详尽的代码注释,帮你理解代码逻辑和原理。
你可以在关注本公众号后,在公众号发送消息『AVDemo』来了解相关工程源码。
1、视频采集模块
首先,实现一个 KFVideoCaptureConfig 类用于定义视频采集参数的配置。
KFVideoCaptureConfig.h
1
2
3
4
5
6
7
8
9
10
11
12
13
14
15
16
17
18
19
20
21
22
#import <Foundation/Foundation.h>
#import <AVFoundation/AVFoundation.h>

NS_ASSUME_NONNULL_BEGIN

typedef NS_ENUM(NSInteger, KFVideoCaptureMirrorType) {
    KFVideoCaptureMirrorNone = 0,
    KFVideoCaptureMirrorFront = 1 << 0,
    KFVideoCaptureMirrorBack = 1 << 1,
    KFVideoCaptureMirrorAll = (KFVideoCaptureMirrorFront | KFVideoCaptureMirrorBack),
};

@interface KFVideoCaptureConfig : NSObject
@property (nonatomic, copy) AVCaptureSessionPreset preset; // 视频采集参数,比如分辨率等,与画质相关。
@property (nonatomic, assign) AVCaptureDevicePosition position; // 摄像头位置,前置/后置摄像头。
@property (nonatomic, assign) AVCaptureVideoOrientation orientation; // 视频画面方向。
@property (nonatomic, assign) NSInteger fps; // 视频帧率。
@property (nonatomic, assign) OSType pixelFormatType; // 颜色空间格式。
@property (nonatomic, assign) KFVideoCaptureMirrorType mirrorType; // 镜像类型。
@end

NS_ASSUME_NONNULL_END
这里的参数包括了:分辨率、摄像头位置、画面方向、帧率、颜色空间格式、镜像类型这几个参数。
其中画面方向是指采集的视频画面是可以带方向的,包括:Portrait、PortraitUpsideDown、LandscapeRight、LandscapeLeft 这几种。
颜色空间格式对应 RGB、YCbCr 这些概念,具体来讲,一般我们采集图像用于后续的编码时,这里设置 kCVPixelFormatType_420YpCbCr8BiPlanarFullRange 即可;如果想支持 HDR 时(iPhone12 及之后设备才支持),这里设置 kCVPixelFormatType_420YpCbCr10BiPlanarVideoRange。在我们这个 Demo 中,我们想要将采集的图像数据直接转换并存储为图片,所以我们会设置采集的颜色空间格式为 kCVPixelFormatType_32BGRA,这样将更方便将 CMSampleBuffer 转换为 UIImage。后面你会看到这个逻辑。
镜像类型表示采集的画面是否左右镜像,这个在直播时,主播经常需要考虑是否对自己的画面进行镜像,从而决定主播和观众的所见画面是否在『左右』概念的理解上保持一致。
其他的几个参数大家应该从字面上就能理解,就不做过多解释了。
KFVideoCaptureConfig.m
1
2
3
4
5
6
7
8
9
10
11
12
13
14
15
16
17
18
19
20
21
22
23
#import "KFVideoCaptureConfig.h"

@implementation KFVideoCaptureConfig

- (instancetype)init {
    self = [super init];
    if (self) {
        _preset = AVCaptureSessionPreset1920x1080;
        _position = AVCaptureDevicePositionFront;
        _orientation = AVCaptureVideoOrientationPortrait;
        _fps = 30;
        _mirrorType = KFVideoCaptureMirrorFront;

        // 设置颜色空间格式,这里要注意了:
        // 1、一般我们采集图像用于后续的编码时,这里设置 kCVPixelFormatType_420YpCbCr8BiPlanarFullRange 即可。
        // 2、如果想支持 HDR 时(iPhone12 及之后设备才支持),这里设置为:kCVPixelFormatType_420YpCbCr10BiPlanarVideoRange。
        _pixelFormatType = kCVPixelFormatType_420YpCbCr8BiPlanarFullRange;
    }

    return self;
}

@end
上面我们在 KFVideoCaptureConfig 的初始化方法里提供了一些默认值。
接下来,我们实现一个 KFVideoCapture 类来实现视频采集。
KFVideoCapture.h
1
2
3
4
5
6
7
8
9
10
11
12
13
14
15
16
17
18
19
20
21
22
#import <Foundation/Foundation.h>
#import "KFVideoCaptureConfig.h"

NS_ASSUME_NONNULL_BEGIN

@interface KFVideoCapture : NSObject
+ (instancetype)new NS_UNAVAILABLE;
- (instancetype)init NS_UNAVAILABLE;
- (instancetype)initWithConfig:(KFVideoCaptureConfig *)config;

@property (nonatomic, strong, readonly) KFVideoCaptureConfig *config;
@property (nonatomic, strong, readonly) AVCaptureVideoPreviewLayer *previewLayer; // 视频预览渲染 layer。
@property (nonatomic, copy) void (^sampleBufferOutputCallBack)(CMSampleBufferRef sample); // 视频采集数据回调。
@property (nonatomic, copy) void (^sessionErrorCallBack)(NSError *error); // 视频采集会话错误回调。
@property (nonatomic, copy) void (^sessionInitSuccessCallBack)(void); // 视频采集会话初始化成功回调。

- (void)startRunning; // 开始采集。
- (void)stopRunning; // 停止采集。
- (void)changeDevicePosition:(AVCaptureDevicePosition)position; // 切换摄像头。
@end

NS_ASSUME_NONNULL_END
上面是 KFVideoCapture 的接口设计,可以看到这些接口类似音频采集器的接口设计,除了初始化方法,主要是有获取视频配置以及视频采集数据回调和错误回调的接口,另外就是开始采集和停止采集的接口。
有一些不同的是,这里还提供了初始化成功回调、视频预览渲染 Layer、以及切换摄像头的接口,这个主要是因为视频采集一般会实现所见即所得,能让用户看到实时采集的画面,这样就需要在初始化成功后让业务层感知到来做一些 UI 布局,并通过预览渲染的 Layer 来展示采集的画面。切换摄像头的接口则主要是对应了手机设备常见的前置、后置等多摄像头的能力。
在上面的音频采集数据回调接口中,我们依然使用了 CMSampleBufferRef,可见这个数据结构的通用性和重要性。
KFVideoCapture.m
1
2
3
4
5
6
7
8
9
10
11
12
13
14
15
16
17
18
19
20
21
22
23
24
25
26
27
28
29
30
31
32
33
34
35
36
37
38
39
40
41
42
43
44
45
46
47
48
49
50
51
52
53
54
55
56
57
58
59
60
61
62
63
64
65
66
67
68
69
70
71
72
73
74
75
76
77
78
79
80
81
82
83
84
85
86
87
88
89
90
91
92
93
94
95
96
97
98
99
100
101
102
103
104
105
106
107
108
109
110
111
112
113
114
115
116
117
118
119
120
121
122
123
124
125
126
127
128
129
130
131
132
133
134
135
136
137
138
139
140
141
142
143
144
145
146
147
148
149
150
151
152
153
154
155
156
157
158
159
160
161
162
163
164
165
166
167
168
169
170
171
172
173
174
175
176
177
178
179
180
181
182
183
184
185
186
187
188
189
190
191
192
193
194
195
196
197
198
199
200
201
202
203
204
205
206
207
208
209
210
211
212
213
214
215
216
217
218
219
220
221
222
223
224
225
226
227
228
229
230
231
232
233
234
235
236
237
238
239
240
241
242
243
244
245
246
247
248
249
250
251
252
253
254
255
256
257
258
259
260
261
262
263
264
265
266
267
268
269
270
271
272
273
274
275
276
277
278
279
280
281
282
283
284
285
286
287
288
289
290
291
292
293
294
295
296
297
298
299
300
301
302
303
304
305
306
307
308
309
310
311
312
313
314
315
316
317
318
#import "KFVideoCapture.h"
#import <UIKit/UIKit.h>

@interface KFVideoCapture () <AVCaptureVideoDataOutputSampleBufferDelegate>
@property (nonatomic, strong, readwrite) KFVideoCaptureConfig *config;
@property (nonatomic, strong, readonly) AVCaptureDevice *captureDevice; // 视频采集设备。
@property (nonatomic, strong) AVCaptureDeviceInput *backDeviceInput; // 后置摄像头采集输入。
@property (nonatomic, strong) AVCaptureDeviceInput *frontDeviceInput; // 前置摄像头采集输入。
@property (nonatomic, strong) AVCaptureVideoDataOutput *videoOutput; // 视频采集输出。
@property (nonatomic, strong) AVCaptureSession *captureSession; // 视频采集会话。
@property (nonatomic, strong, readwrite) AVCaptureVideoPreviewLayer *previewLayer; // 视频预览渲染 layer。
@property (nonatomic, assign, readonly) CMVideoDimensions sessionPresetSize; // 视频采集分辨率。
@property (nonatomic, strong) dispatch_queue_t captureQueue;
@end

@implementation KFVideoCapture
#pragma mark - Property
- (AVCaptureDevice *)backCamera {
    return [self cameraWithPosition:AVCaptureDevicePositionBack];
}

- (AVCaptureDeviceInput *)backDeviceInput {
    if (!_backDeviceInput) {
        _backDeviceInput = [[AVCaptureDeviceInput alloc] initWithDevice:[self backCamera] error:nil];
    }

    return _backDeviceInput;
}

- (AVCaptureDevice *)frontCamera {
    return [self cameraWithPosition:AVCaptureDevicePositionFront];
}

- (AVCaptureDeviceInput *)frontDeviceInput {
    if (!_frontDeviceInput) {
        _frontDeviceInput = [[AVCaptureDeviceInput alloc] initWithDevice:[self frontCamera] error:nil];
    }

    return _frontDeviceInput;
}

- (AVCaptureVideoDataOutput *)videoOutput {
    if (!_videoOutput) {
        _videoOutput = [[AVCaptureVideoDataOutput alloc] init];
        [_videoOutput setSampleBufferDelegate:self queue:self.captureQueue]; // 设置返回采集数据的代理和回调。
        _videoOutput.videoSettings = @{(id)kCVPixelBufferPixelFormatTypeKey: @(_config.pixelFormatType)};
        _videoOutput.alwaysDiscardsLateVideoFrames = YES; // YES 表示:采集的下一帧到来前,如果有还未处理完的帧,丢掉。
    }

    return _videoOutput;
}

- (AVCaptureSession *)captureSession {
    if (!_captureSession) {
        AVCaptureDeviceInput *deviceInput = self.config.position == AVCaptureDevicePositionBack ? self.backDeviceInput : self.frontDeviceInput;
        if (!deviceInput) {
            return nil;
        }
        // 1、初始化采集会话。
        _captureSession = [[AVCaptureSession alloc] init];

        // 2、添加采集输入。
        for (AVCaptureSessionPreset selectPreset in [self sessionPresetList]) {
            if ([_captureSession canSetSessionPreset:selectPreset]) {
                [_captureSession setSessionPreset:selectPreset];
                if ([_captureSession canAddInput:deviceInput]) {
                    [_captureSession addInput:deviceInput];
                    break;
                }
            }
        }

        // 3、添加采集输出。
        if ([_captureSession canAddOutput:self.videoOutput]) {
            [_captureSession addOutput:self.videoOutput];
        }

        // 4、更新画面方向。
        [self _updateOrientation];

        // 5、更新画面镜像。
        [self _updateMirror];

        // 6、更新采集实时帧率。
        [self.captureDevice lockForConfiguration:nil];
        [self _updateActiveFrameDuration];
        [self.captureDevice unlockForConfiguration];

        // 7、回报成功。
        if (self.sessionInitSuccessCallBack) {
            self.sessionInitSuccessCallBack();
        }
    }

    return _captureSession;
}

- (AVCaptureVideoPreviewLayer *)previewLayer {
    if (!_captureSession) {
        return nil;
    }
    if (!_previewLayer) {
        // 初始化预览渲染 layer。这里就直接用系统提供的 API 来渲染。
        _previewLayer = [[AVCaptureVideoPreviewLayer alloc] initWithSession:_captureSession];
        [_previewLayer setVideoGravity:AVLayerVideoGravityResizeAspectFill];
    }

    return _previewLayer;
}

- (AVCaptureDevice *)captureDevice {
    // 视频采集设备。
    return (self.config.position == AVCaptureDevicePositionBack) ? [self backCamera] : [self frontCamera];
}

- (CMVideoDimensions)sessionPresetSize {
    // 视频采集分辨率。
    return CMVideoFormatDescriptionGetDimensions([self captureDevice].activeFormat.formatDescription);
}

#pragma mark - LifeCycle
- (instancetype)initWithConfig:(KFVideoCaptureConfig *)config {
    self = [super init];
    if (self) {
        _config = config;
        _captureQueue = dispatch_queue_create("com.KeyFrameKit.videoCapture", DISPATCH_QUEUE_SERIAL);
        [[NSNotificationCenter defaultCenter] addObserver:self selector:@selector(sessionRuntimeError:) name:AVCaptureSessionRuntimeErrorNotification object:nil];
    }

    return self;
}

- (void)dealloc {
    [[NSNotificationCenter defaultCenter] removeObserver:self];
}

#pragma mark - Public Method
- (void)startRunning {
    typeof(self) __weak weakSelf = self;
    dispatch_async(_captureQueue, ^{
        [weakSelf _startRunning];
    });
}

- (void)stopRunning {
    typeof(self) __weak weakSelf = self;
    dispatch_async(_captureQueue, ^{
        [weakSelf _stopRunning];
    });
}

- (void)changeDevicePosition:(AVCaptureDevicePosition)position {
    typeof(self) __weak weakSelf = self;
    dispatch_async(_captureQueue, ^{
        [weakSelf _updateDeveicePosition:position];
    });
}

#pragma mark - Private Method
- (void)_startRunning {
    AVAuthorizationStatus status = [AVCaptureDevice authorizationStatusForMediaType:AVMediaTypeVideo];
    if (status == AVAuthorizationStatusAuthorized) {
        if (!self.captureSession.isRunning) {
            [self.captureSession startRunning];
        }
    } else {
        NSLog(@"没有相机使用权限");
    }
}

- (void)_stopRunning {
    if (_captureSession && _captureSession.isRunning) {
        [_captureSession stopRunning];
    }
}

- (void)_updateDeveicePosition:(AVCaptureDevicePosition)position {
    // 切换采集的摄像头。

    if (position == self.config.position || !_captureSession.isRunning) {
        return;
    }

    // 1、切换采集输入。
    AVCaptureDeviceInput *curInput = self.config.position == AVCaptureDevicePositionBack ? self.backDeviceInput : self.frontDeviceInput;
    AVCaptureDeviceInput *addInput = self.config.position == AVCaptureDevicePositionBack ? self.frontDeviceInput : self.backDeviceInput;
    if (!curInput || !addInput) {
        return;
    }
    [self.captureSession removeInput:curInput];
    for (AVCaptureSessionPreset selectPreset in [self sessionPresetList]) {
        if ([_captureSession canSetSessionPreset:selectPreset]) {
            [_captureSession setSessionPreset:selectPreset];
            if ([_captureSession canAddInput:addInput]) {
                [_captureSession addInput:addInput];
                self.config.position = position;
                break;
            }
        }
    }

    // 2、更新画面方向。
    [self _updateOrientation];

    // 3、更新画面镜像。
    [self _updateMirror];

    // 4、更新采集实时帧率。
    [self.captureDevice lockForConfiguration:nil];
    [self _updateActiveFrameDuration];
    [self.captureDevice unlockForConfiguration];
}

- (void)_updateOrientation {
    // 更新画面方向。
    AVCaptureConnection *connection = [self.videoOutput connectionWithMediaType:AVMediaTypeVideo]; // AVCaptureConnection 用于把输入和输出连接起来。
    if ([connection isVideoOrientationSupported] && connection.videoOrientation != self.config.orientation) {
        connection.videoOrientation = self.config.orientation;
    }
}

- (void)_updateMirror {
    // 更新画面镜像。
    AVCaptureConnection *connection = [self.videoOutput connectionWithMediaType:AVMediaTypeVideo];
    if ([connection isVideoMirroringSupported]) {
        if ((self.config.mirrorType & KFVideoCaptureMirrorFront) && self.config.position == AVCaptureDevicePositionFront) {
            connection.videoMirrored = YES;
        } else if ((self.config.mirrorType & KFVideoCaptureMirrorBack) && self.config.position == AVCaptureDevicePositionBack) {
            connection.videoMirrored = YES;
        } else {
            connection.videoMirrored = NO;
        }
    }
}

- (BOOL)_updateActiveFrameDuration {
    // 更新采集实时帧率。

    // 1、帧率换算成帧间隔时长。
    CMTime frameDuration = CMTimeMake(1, (int32_t) self.config.fps);

    // 2、设置帧率大于 30 时,找到满足该帧率及其他参数,并且当前设备支持的 AVCaptureDeviceFormat。
    if (self.config.fps > 30) {
        for (AVCaptureDeviceFormat *vFormat in [self.captureDevice formats]) {
            CMFormatDescriptionRef description = vFormat.formatDescription;
            CMVideoDimensions dims = CMVideoFormatDescriptionGetDimensions(description);
            float maxRate = ((AVFrameRateRange *) [vFormat.videoSupportedFrameRateRanges objectAtIndex:0]).maxFrameRate;
            if (maxRate >= self.config.fps && CMFormatDescriptionGetMediaSubType(description) == self.config.pixelFormatType && self.sessionPresetSize.width * self.sessionPresetSize.height == dims.width * dims.height) {
                self.captureDevice.activeFormat = vFormat;
                break;
            }
        }
    }

    // 3、检查设置的帧率是否在当前设备的 activeFormat 支持的最低和最高帧率之间。如果是,就设置帧率。
    __block BOOL support = NO;
    [self.captureDevice.activeFormat.videoSupportedFrameRateRanges enumerateObjectsUsingBlock:^(AVFrameRateRange * _Nonnull obj, NSUInteger idx, BOOL * _Nonnull stop) {
        if (CMTimeCompare(frameDuration, obj.minFrameDuration) >= 0 &&
            CMTimeCompare(frameDuration, obj.maxFrameDuration) <= 0) {
            support = YES;
            *stop = YES;
        }
    }];
    if (support) {
        [self.captureDevice setActiveVideoMinFrameDuration:frameDuration];
        [self.captureDevice setActiveVideoMaxFrameDuration:frameDuration];
        return YES;
    }

    return NO;
}

#pragma mark - NSNotification
- (void)sessionRuntimeError:(NSNotification *)notification {
    if (self.sessionErrorCallBack) {
        self.sessionErrorCallBack(notification.userInfo[AVCaptureSessionErrorKey]);
    }
}

#pragma mark - Utility
- (AVCaptureDevice *)cameraWithPosition:(AVCaptureDevicePosition)position {
    // 从当前手机寻找符合需要的采集设备。
    NSArray *devices = nil;
    NSString *version = [UIDevice currentDevice].systemVersion;
    if (version.doubleValue >= 10.0) {
        AVCaptureDeviceDiscoverySession *deviceDiscoverySession = [AVCaptureDeviceDiscoverySession  discoverySessionWithDeviceTypes:@[AVCaptureDeviceTypeBuiltInWideAngleCamera] mediaType:AVMediaTypeVideo position:position];
        devices = deviceDiscoverySession.devices;
    } else {
#pragma GCC diagnostic push
#pragma GCC diagnostic ignored "-Wdeprecated-declarations"
        devices = [AVCaptureDevice devicesWithMediaType:AVMediaTypeVideo];
#pragma GCC diagnostic pop
    }

    for (AVCaptureDevice *device in devices) {
        if ([device position] == position) {
            return device;
        }
    }

    return nil;
}

- (NSArray *)sessionPresetList {
    return @[self.config.preset, AVCaptureSessionPreset3840x2160, AVCaptureSessionPreset1920x1080, AVCaptureSessionPreset1280x720, AVCaptureSessionPresetLow];
}

#pragma mark - AVCaptureVideoDataOutputSampleBufferDelegate
- (void)captureOutput:(AVCaptureOutput *)output didOutputSampleBuffer:(CMSampleBufferRef)sampleBuffer fromConnection:(AVCaptureConnection *)connection {
    // 向外回调数据。
    if (output == self.videoOutput) {
        if (self.sampleBufferOutputCallBack) {
            self.sampleBufferOutputCallBack(sampleBuffer);
        }
    }
}

@end
上面是 KFVideoCapture 的实现,结合下面这两张图可以让我们更好地理解这些代码:
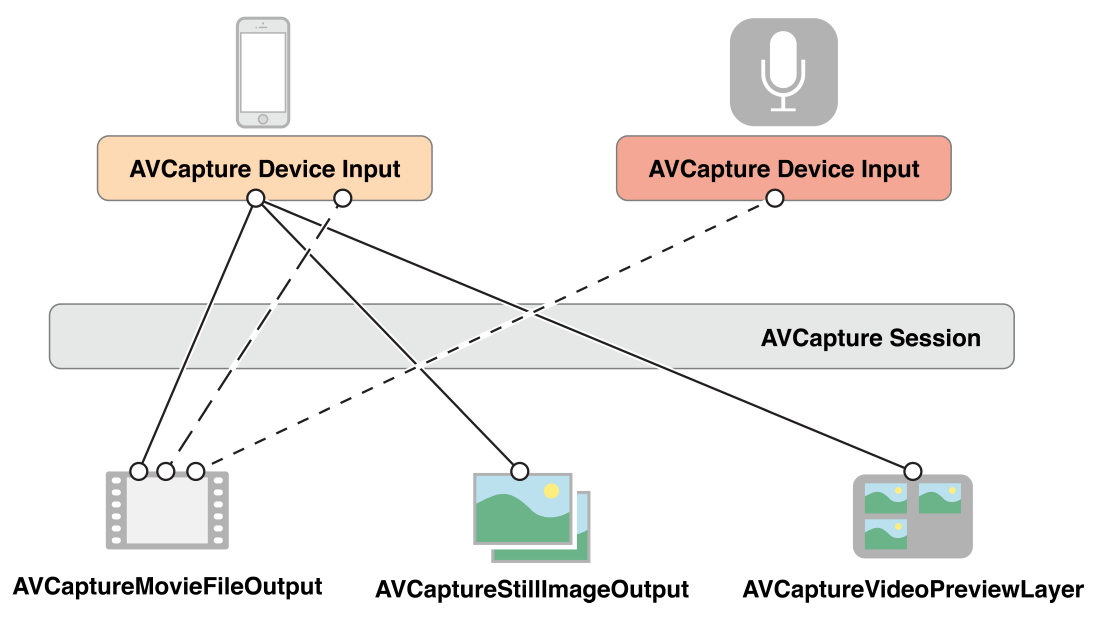 AVCaptureSession 配置多组输入输出
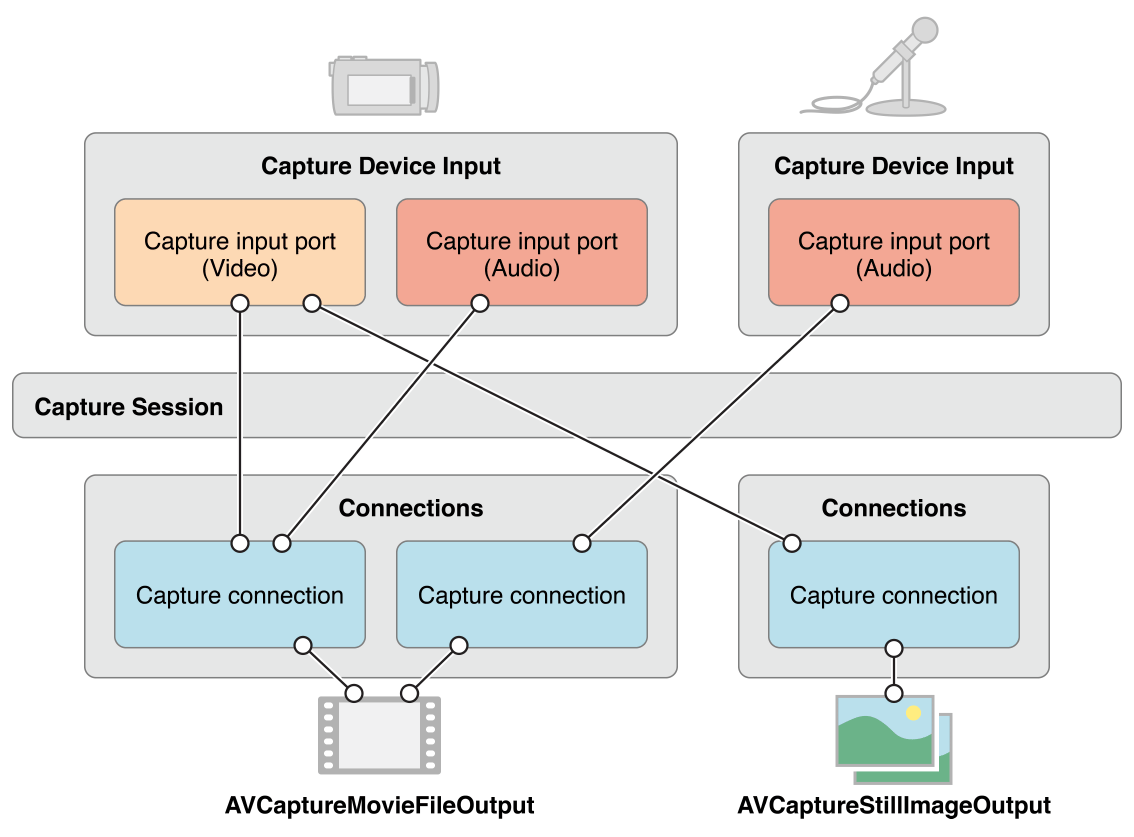 AVCaptureConnection 连接单或多输入到单输出
可以看到在实现采集时,我们是用 AVCaptureSession 来串联采集设备作为输入,其他输出对象作为输出。我们这个 Demo 里的一个输出对象就是 AVCaptureVideoPreviewLayer,用它来接收输出的数据并渲染。此外,还可以使用 AVCaptureConnection 来连接一个或多个输入到一个输出。
从代码上可以看到主要有这几个部分:
- 1)创建采集设备
AVCaptureDevice。- 在
-captureDevice中实现。 - 由于我们这里的采集模块支持前置和后置摄像头,所以这里的采集设备是根据当前选择的摄像头位置动态指定的。分别对应
-backCamera和-frontCamera。
- 在
- 2)基于采集设备,创建对应的采集输入
AVCaptureDeviceInput。- 由于支持前置和后置摄像头切换,所以这里我们有两个采集输入对象,分别绑定前置和后置摄像头。对应实现在
-backDeviceInput和-frontDeviceInput。
- 由于支持前置和后置摄像头切换,所以这里我们有两个采集输入对象,分别绑定前置和后置摄像头。对应实现在
- 3)创建采集视频数据输出
AVCaptureVideoDataOutput。- 在
-videoOutput中实现。
- 在
- 4)创建采集会话
AVCaptureSession,绑定上面创建的采集输入和视频数据输出。- 在
-captureSession中实现。
- 在
- 5)创建采集画面预览渲染层
AVCaptureVideoPreviewLayer,将它绑定到上面创建的采集会话上。- 在
-previewLayer中实现。 - 该 layer 可以被外层获取用于 UI 布局和展示。
- 在
- 6)基于采集会话的能力封装开始采集和停止采集的对外接口。
- 分别在
-startRunning和-stopRunning方法中实现。注意,这里是开始和停止操作都是放在串行队列中通过dispatch_async异步处理的,这里主要是为了防止主线程卡顿。
- 分别在
- 7)实现切换摄像头的功能。
- 在
-changeDevicePosition:→-_updateDeveicePosition:方法中实现。注意,这里同样是异步处理。
- 在
- 8)实现采集初始化成功回调、数据回调、采集会话错误回调等对外接口。
- 采集初始化成功回调:在
-captureSession中初始化采集会话成功后,向外层回调。 - 数据回调:在
AVCaptureVideoDataOutputSampleBufferDelegate的回调接口-captureOutput:didOutputSampleBuffer:fromConnection:中接收采集数据并回调给外层。 - 采集会话错误回调:在
-sessionRuntimeError:中监听AVCaptureSessionRuntimeErrorNotification通知并向外层回调错误。
- 采集初始化成功回调:在
更具体细节见上述代码及其注释。
2、采集视频并实时展示或截图
我们在一个 ViewController 中来实现视频采集并实时预览的逻辑,也提供了对采集的视频数据截图保存到相册的功能。
KFVideoCaptureViewController.m
1
2
3
4
5
6
7
8
9
10
11
12
13
14
15
16
17
18
19
20
21
22
23
24
25
26
27
28
29
30
31
32
33
34
35
36
37
38
39
40
41
42
43
44
45
46
47
48
49
50
51
52
53
54
55
56
57
58
59
60
61
62
63
64
65
66
67
68
69
70
71
72
73
74
75
76
77
78
79
80
81
82
83
84
85
86
87
88
89
90
91
92
93
94
95
96
97
98
99
100
101
102
103
104
105
106
107
108
109
110
111
112
113
114
115
116
117
118
119
120
121
122
123
124
125
126
127
128
129
130
131
132
133
134
135
136
137
138
139
140
141
142
143
144
145
146
147
148
149
150
151
152
153
154
155
156
157
158
159
160
161
162
163
164
165
166
167
168
169
170
171
172
#import "KFVideoCaptureViewController.h"
#import "KFVideoCapture.h"
#import <Photos/Photos.h>

@interface KFVideoCaptureViewController ()
@property (nonatomic, strong) KFVideoCaptureConfig *videoCaptureConfig;
@property (nonatomic, strong) KFVideoCapture *videoCapture;
@property (nonatomic, assign) int shotCount;
@end

@implementation KFVideoCaptureViewController
#pragma mark - Property
- (KFVideoCaptureConfig *)videoCaptureConfig {
    if (!_videoCaptureConfig) {
        _videoCaptureConfig = [[KFVideoCaptureConfig alloc] init];
        // 由于我们的想要从采集的图像数据里直接转换并存储图片,所以我们这里设置采集处理的颜色空间格式为 32bit BGRA,这样方便将 CMSampleBuffer 转换为 UIImage。
        _videoCaptureConfig.pixelFormatType = kCVPixelFormatType_32BGRA;
    }

    return _videoCaptureConfig;
}

- (KFVideoCapture *)videoCapture {
    if (!_videoCapture) {
        _videoCapture = [[KFVideoCapture alloc] initWithConfig:self.videoCaptureConfig];
        __weak typeof(self) weakSelf = self;
        _videoCapture.sessionInitSuccessCallBack = ^() {
            dispatch_async(dispatch_get_main_queue(), ^{
                [weakSelf.view.layer addSublayer:weakSelf.videoCapture.previewLayer];
                weakSelf.videoCapture.previewLayer.frame = weakSelf.view.bounds;
            });
        };
        _videoCapture.sampleBufferOutputCallBack = ^(CMSampleBufferRef sample) {
            if (weakSelf.shotCount > 0) {
                weakSelf.shotCount--;
                [weakSelf saveSampleBuffer:sample];
            }
        };
        _videoCapture.sessionErrorCallBack = ^(NSError* error) {
            NSLog(@"KFVideoCapture Error:%zi %@", error.code, error.localizedDescription);
        };
    }

    return _videoCapture;
}

#pragma mark - Lifecycle
- (void)viewDidLoad {
    [super viewDidLoad];
    self.edgesForExtendedLayout = UIRectEdgeAll;
    self.extendedLayoutIncludesOpaqueBars = YES;
    self.title = @"Video Capture";
    self.view.backgroundColor = [UIColor whiteColor];

    self.shotCount = 0;
    [self requestAccessForVideo];

    // Navigation item.
    UIBarButtonItem *cameraBarButton = [[UIBarButtonItem alloc] initWithTitle:@"切换" style:UIBarButtonItemStylePlain target:self action:@selector(changeCamera)];
    UIBarButtonItem *shotBarButton = [[UIBarButtonItem alloc] initWithTitle:@"截图" style:UIBarButtonItemStylePlain target:self action:@selector(shot)];
    self.navigationItem.rightBarButtonItems = @[cameraBarButton, shotBarButton];
}

- (void)viewWillLayoutSubviews {
    [super viewWillLayoutSubviews];
    self.videoCapture.previewLayer.frame = self.view.bounds;
}

- (void)dealloc {

}

#pragma mark - Action
- (void)changeCamera {
    [self.videoCapture changeDevicePosition:self.videoCapture.config.position == AVCaptureDevicePositionBack ? AVCaptureDevicePositionFront : AVCaptureDevicePositionBack];
}

- (void)shot {
    self.shotCount = 1;
}

#pragma mark - Utility
- (void)requestAccessForVideo {
    __weak typeof(self) weakSelf = self;
    AVAuthorizationStatus status = [AVCaptureDevice authorizationStatusForMediaType:AVMediaTypeVideo];
    switch (status) {
        case AVAuthorizationStatusNotDetermined: {
            // 许可对话没有出现,发起授权许可。
            [AVCaptureDevice requestAccessForMediaType:AVMediaTypeVideo completionHandler:^(BOOL granted) {
                if (granted) {
                    [weakSelf.videoCapture startRunning];
                } else {
                    // 用户拒绝。
                }
            }];
            break;
        }
        case AVAuthorizationStatusAuthorized: {
            // 已经开启授权,可继续。
            [weakSelf.videoCapture startRunning];
            break;
        }
        default:
            break;
    }
}

- (void)saveSampleBuffer:(CMSampleBufferRef)sampleBuffer {
    __block UIImage *image = [self imageFromSampleBuffer:sampleBuffer];

    PHAuthorizationStatus authorizationStatus = [PHPhotoLibrary authorizationStatus];
    if (authorizationStatus == PHAuthorizationStatusAuthorized) {
        PHPhotoLibrary *library = [PHPhotoLibrary sharedPhotoLibrary];
        [library performChanges:^{
            [PHAssetChangeRequest creationRequestForAssetFromImage:image];
        } completionHandler:^(BOOL success, NSError * _Nullable error) {

        }];
    } else if (authorizationStatus == PHAuthorizationStatusNotDetermined) {
        // 如果没请求过相册权限,弹出指示框,让用户选择。
        [PHPhotoLibrary requestAuthorization:^(PHAuthorizationStatus status) {
            // 如果用户选择授权,则保存图片。
            if (status == PHAuthorizationStatusAuthorized) {
                [PHAssetChangeRequest creationRequestForAssetFromImage:image];
            }
        }];
    } else {
        NSLog(@"无相册权限。");
    }
}

- (UIImage *)imageFromSampleBuffer:(CMSampleBufferRef)sampleBuffer {
    // 从 CMSampleBuffer 中创建 UIImage。

    // 从 CMSampleBuffer 获取 CVImageBuffer(也是 CVPixelBuffer)。
    CVImageBufferRef imageBuffer = CMSampleBufferGetImageBuffer(sampleBuffer);

    // 锁定 CVPixelBuffer 的基地址。
    CVPixelBufferLockBaseAddress(imageBuffer, 0);
    void *baseAddress = CVPixelBufferGetBaseAddress(imageBuffer);

    // 获取 CVPixelBuffer 每行的字节数。
    size_t bytesPerRow = CVPixelBufferGetBytesPerRow(imageBuffer);
    // 获取 CVPixelBuffer 的宽高。
    size_t width = CVPixelBufferGetWidth(imageBuffer);
    size_t height = CVPixelBufferGetHeight(imageBuffer);

    // 创建设备相关的 RGB 颜色空间。这里的颜色空间要与 CMSampleBuffer 图像数据的颜色空间一致。
    CGColorSpaceRef colorSpace = CGColorSpaceCreateDeviceRGB();

    // 基于 CVPixelBuffer 的数据创建绘制 bitmap 的上下文。
    CGContextRef context = CGBitmapContextCreate(baseAddress, width, height, 8, bytesPerRow, colorSpace, kCGBitmapByteOrder32Little | kCGImageAlphaPremultipliedFirst);

    // 从 bitmap 绘制的上下文中获取 CGImage 图像。
    CGImageRef quartzImage = CGBitmapContextCreateImage(context);
    // 解锁 CVPixelBuffer。
    CVPixelBufferUnlockBaseAddress(imageBuffer, 0);

    // 是否上下文和颜色空间。
    CGContextRelease(context);
    CGColorSpaceRelease(colorSpace);

    // 从 CGImage 转换到 UIImage。
    UIImage *image = [UIImage imageWithCGImage:quartzImage];

    // 释放 CGImage。
    CGImageRelease(quartzImage);

    return image;
}

@end
上面是 KFVideoCaptureViewController 的实现,主要分为以下几个部分:
- 1)在
-videoCaptureConfig中初始化采集配置参数。- 这里需要注意的是,我们设置了采集的颜色空间格式为
kCVPixelFormatType_32BGRA。这主要是为了方便后面截图时转换数据。
- 这里需要注意的是,我们设置了采集的颜色空间格式为
- 2)在
-videoCapture中初始化采集器,并实现了采集会话初始化成功的回调、采集数据回调、采集错误回调。 - 3)在采集会话初始化成功的回调
sessionInitSuccessCallBack中,对采集预览渲染视图层进行布局。 - 4)在采集数据回调
sampleBufferOutputCallBack中,实现了截图逻辑。- 通过
-saveSampleBuffer:→-imageFromSampleBuffer:方法中实现截图。 -saveSampleBuffer:方法主要实现请求相册权限,以及获取图像存储到相册的逻辑。-imageFromSampleBuffer:方法实现了将CMSampleBuffer转换为UIImage的逻辑。这里需要注意的是,我们在绘制 bitmap 时使用的是 RGB 颜色空间,与前面设置的采集的颜色空间一致。如果这里前后设置不一致,转换图像会出问题。
- 通过
- 5)在
-requestAccessForVideo方法中请求相机权限并启动采集。 - 6)在
-changeCamera方法中实现切换摄像头。
更具体细节见上述代码及其注释。
本文转自微信公众号
关键帧Keyframe,推荐您关注来获取音视频、AI 领域的最新技术和产品信息:
微信扫码关注我们
你还可以加入我们的微信群和更多同行朋友来交流和讨论:
微信扫码进群